

Caustics and the Photon Tracing Kernel
Version 1.1, Updated April 2023 using Octane 2022.1 and C4D 2023.1.3
I. Intro
At some point in our lives, we’ve either observed or intentionally made pretty light patterns by moving a metal or glass object around a sunny room. These patterns are called “caustics”, and are created when light bounces off a reflective surface (or passes through a refractive one), and concentrates on a matte surface.
The concentration part is what we’re most interested in when trying to replicate this effect in Octane. The more rays we can redirect so they’re overlapping when they hit our matte surface, the sharper and more vibrant the pattern will be.
Caustics takes a lot of calculations and is one of the more difficult things we can ask of a GPU. In this guide, we’ll take a look at how Octane handles this phenomenon and the best way to set up our scene to get the maximum impact without spending the rest of our lives rendering.
This guide is split in four sections. Section II is designed to get you up and running quickly. Section III is a deep dive into all the settings that affect caustics, and Section IV is a step-by-step workflow.
PDF
II. Basics
In order to get interesting visible caustic patterns, we need:
1. A piece of geometry with a reflective or refractive material on it (metal, glass, shiny plastic) to cast caustics.
2. A piece of geometry (usually flat, but it doesn’t have to be) for the caustic pattern to appear on. The material applied to this surface should be matte or rough. It can have some reflection, but too much starts to degrade the effect.
3. A light that bounces off our reflective (or through refractive) geometry on to the matte surface.
4. Octane’s kernel set to Pathtracing, PMC, or Photon Tracing. If we’re using Photon Tracing, each material that casts caustics needs to have the “allow caustics” checkbox turned on.
Let’s set this up real quick.

Step 1 - Geometry
In a new scene, let’s create a tube primitive. This will be our caustics casting object. Let’s make the outer radius 60, give it 100 rotation segments so it’s smooth, position it +50 cm on Y, and in the Slice tab, turn on Slice. This defaults to a slice from 0-180 degrees, which is perfect. We also need something for our caustic pattern to appear on - let’s make a Plane object and set it to 1000x1000 cm.
In a new scene, let’s create a tube primitive. This will be our caustics casting object. Let’s make the outer radius 60, give it 100 rotation segments so it’s smooth, position it +50 cm on Y, and in the Slice tab, turn on Slice. This defaults to a slice from 0-180 degrees, which is perfect. We also need something for our caustic pattern to appear on - let’s make a Plane object and set it to 1000x1000 cm.
Step 2 - Materials
Next, we need two materials - we’ll use the Universal type. The first material will be for the plane, so we’ll want this to be a matte dark gray. Let’s bring the Specular to 0 and change the Albedo to H:0, S:0, V:25%. We can go ahead and drop it on the plane. The second material will be the metal for the tube, so let’s bring the Metallic up to 1, and the Albedo Value to pure white - H:0, S:0, V=100%, and drop this on the tube. In the IOR tab, we need to check “Allow caustics” for the Photon Tracing kernel to use it to cast caustics.
Next, we need two materials - we’ll use the Universal type. The first material will be for the plane, so we’ll want this to be a matte dark gray. Let’s bring the Specular to 0 and change the Albedo to H:0, S:0, V:25%. We can go ahead and drop it on the plane. The second material will be the metal for the tube, so let’s bring the Metallic up to 1, and the Albedo Value to pure white - H:0, S:0, V=100%, and drop this on the tube. In the IOR tab, we need to check “Allow caustics” for the Photon Tracing kernel to use it to cast caustics.
Step 3 - Lighting
Let’s keep it simple this time and use an Octane Area Light. We want it to bounce off the inside of the tube and hit the floor plane, so let’s set the Position coordinates to X:0, Y:300, Z:-300, and the Rotation.P to -45 degrees.
Let’s keep it simple this time and use an Octane Area Light. We want it to bounce off the inside of the tube and hit the floor plane, so let’s set the Position coordinates to X:0, Y:300, Z:-300, and the Rotation.P to -45 degrees.
Step 4 - Rendering
For our render settings, let’s set the kernel to Path Tracing, Max Samples to 2048, and GI Clamp to 10. The first bunch of samples come in as white speckles, but eventually it resolves to a heart-shaped Nephroid caustic pattern.
For our render settings, let’s set the kernel to Path Tracing, Max Samples to 2048, and GI Clamp to 10. The first bunch of samples come in as white speckles, but eventually it resolves to a heart-shaped Nephroid caustic pattern.
It’s a little weak and grainy, but voila, we have caustics!
If we switch to the PMC kernel, we’ll see that we need fewer samples to get a nice look, but it takes nearly twice as long to render half the samples. It also takes even more samples to resolve the caustic pattern, so lookdev tweaking would take forever unless we had a serious beast of a workstation.
Now let’s switch the shiny new Photon Tracing kernel, and make sure our metal material has “allow caustics” checked in the IOR tab. Right away we’ll see that the caustics start to clearly resolve within 4 samples! Also it takes FAR fewer max samples to get it looking nice. If we want caustics, this is going to be the way to go most of the time moving forward.
These are the absolute bare minimum basics of how to set up caustics, but as we’ll soon see, there are a lot of tweaky factors we’re going to have to be aware of if we want it to look amazing.
III. Deeper Dive
As mentioned at the beginning of the guide, concentration of the rays is the key to getting the most visible caustic patterns. This is affected by four things: Geometry of the casting object, materials, lighting, and render settings. In this section we’re going to dive into each of these categories.
Geometry
Knowing that concentration of light is what we’re after here, it becomes pretty obvious that the shape of the casting object is going to be important.

We can see above how with a reflective material (metal here), the more concave the shape gets, the more the light is concentrated, and the more complex and apparent the caustic pattern gets as it layers up in a tighter area on the ground plane. Convex shapes (far left) splay the light rays out, so there’s just a faint glow at the base of the object. A perfectly flat mirror just evenly illuminates the ground plane and isn’t super fun by itself. The 180 degree concave shape on the far right bounces the light around and creates an intricate nephroid pattern.

More complex shapes produce more complex patterns. The geometry itself doesn’t even need to curve, it just needs to redirect the light, so we could actually use a flat plane with a bump or normal map (far right above), or a bunch of smaller angular pieces (second from the left). to get a pleasing pattern as well. The more curvature in the shape, the more smooth and organic the caustic pattern will be.
Refractive caustics is a whole lot more complicated. There are far more calculations involved which makes them harder to predict, and also harder on the GPU (meaning longer render times).

If we take a similar set of curved uniform cubes that we used in the reflective material example, we’ll see that the light doesn’t concentrate all that much regardless of how much it’s curved. This has to do with how optics works - with a uniform wall, the entrance and exit angles cancel each other out, so most rays keep going in the same direction and the resulting pattern is pretty uniform and and not super interesting.

In a convex lens, the entrance and exit angles compound each other, rather than cancel each other out, so the rays all angle in and focus the light, which is exactly what we want for pretty caustics.

If we take this a step further and create more complex shapes, the light will refract and concentrate in more interesting patterns. It’s not just the geometry though, the IOR and light placement plays an equal role in redirecting the rays, as we’ll see in the Material and Light sections.
Geometry
To get the brightest, sharpest caustics, we want our casting material to either reflect or transmit as much light as possible, and our receiving material to reflect, transmit, and/or absorb as little light as possible. There are a few properties that we need to look at to control this.
Casting Material (Reflective)

The easiest property to understand is roughness. The more rough the reflective casting material is, the more it will disperse light rays and the blurrier and weaker the caustic pattern will be. Fine bump or normal maps have a similar effect to roughness, so we need to be careful when applying these.

The color of the casting material is also very important. When using the HSV color model, colors with a high Value (V) percent will reflect more light and produce better results. Lower Saturation (S) values will produce whiter overlapping areas which will stand them out against darker backgrounds better.

Certain Hue colors (yellow/60°, cyan/180°, and magenta/320°) will naturally reflect more light than others (red/0°, blue/240°, or violet/280°, so we’ll want to make sure to compensate with lower saturation values and higher reflectivity (IOR) with darker colors. For variation, we can use Thin Film or a Coating layer driven by a gradient.
Casting Material (Refractive)
Similar to a reflective material, we want as much unencumbered light traveling through our geometry as possible for nice refractive caustics. Roughness and base color have the same effects as they do with reflective materials: the less roughness and lighter the color, the more light gets through and the brighter the patterns. Where refraction differs is that we also have IOR to contend with and Dispersion at our disposal.
Important: The default mode in recent versions of Octane for the Transmission channel is Diffuse. Change this to Specular for the best results. Diffuse transmission will, well, diffuse the light and not concentrate the rays into caustic patterns like we want.

IOR is a balancing act with geometry and placement of the lights. In general, the lower the IOR, the less the light will bend, and the further away the focal point will be. The thickness of the geometry and angle that the light hits the walls also influences the path of the light. When the IOR gets up too high, the focal point will be so close that the rays coming out the other side will scatter and the caustic pattern will either be soft or difficult to see.
The IOR of air is 1.0, water is 1.3, typical glass is ~1.5, and usually the highest refractive IOR found easily in nature will be gemstones like diamond, which is ~2.4. If sharp caustics are needed at higher IORs, usually the wall thickness will have to be fairly thin, or the object will have to be faceted like a cut gem.
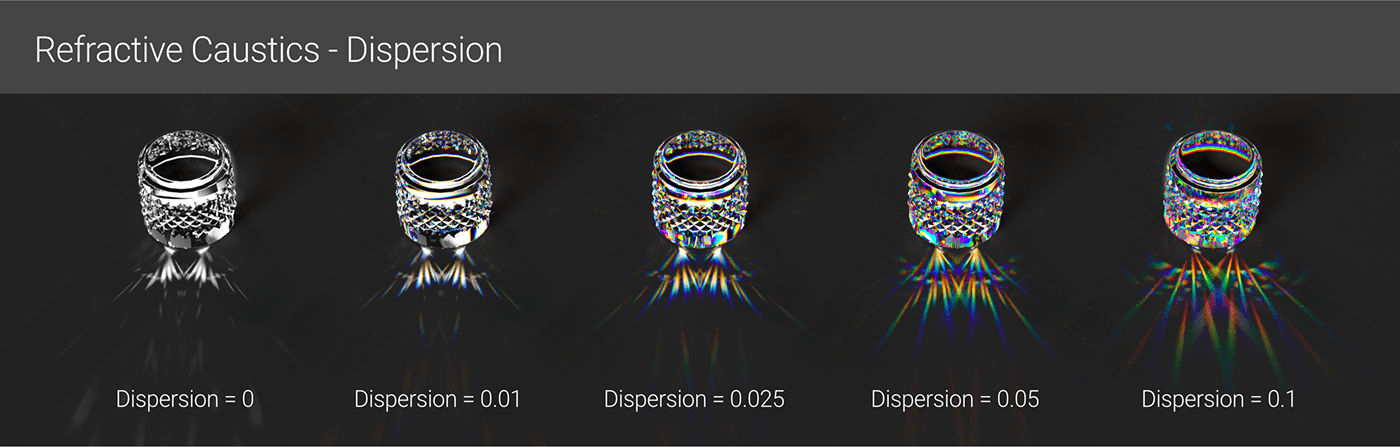
Dispersion is a natural phenomenon that occurs when the various wavelengths that make up visible light interact with a transmissive object. This splitting causes different colors to appear which then translate to the caustics, making for some pretty dramatic effects. Sharp geometry like prisms or cut gems will produce more defined color splitting than soft, wavy geometry like a noise displacer.
Dispersion + Caustics is one of the hardest things we can ask a GPU to do, so we’ll really need to be patient here while it’s calculating refraction and dispersion and caustics. Higher values will often hurt the render time, and using 0.1 (the highest) will often lead to a lot of noise and artifacts that takes a ton of samples to clean up.
Finally, the material that’s going to receive the caustics needs to be set up in in the best way to showcase them.

The base color should be fairly dark and non-reflective (Albedo V (value) starting at ~20-30, and Specular and Metallic channels = 0 will give good results). This will also change as the intensity of the light changes. Generally, the lighter the material on the receiving object gets, the more it washes out the caustic patterns. It can’t get too dark, though, or it will absorb all of the light as seen on the far left above.
In this particular scenario, a value of 30 is right around the sweet spot - dark enough to contrast well, but not so dark that they get absorbed or too bright so we start losing detail in the bright areas.

Reflection also lessens the effects of caustics since it bounces the light away and also reflects the original geometry which may or may not be desirable. Adding roughness to a metallic or high dielectric specular surface will help, but it needs to be fairly high to start seeing the caustics sharpen up (start with 0.5 and go up from there).
Light
In a nutshell, we’re after relatively small, powerful bright lights that produce as many directible, parallel-ish rays as possible that we can bounce off (or through) our objects without then washing out the resulting pattern.
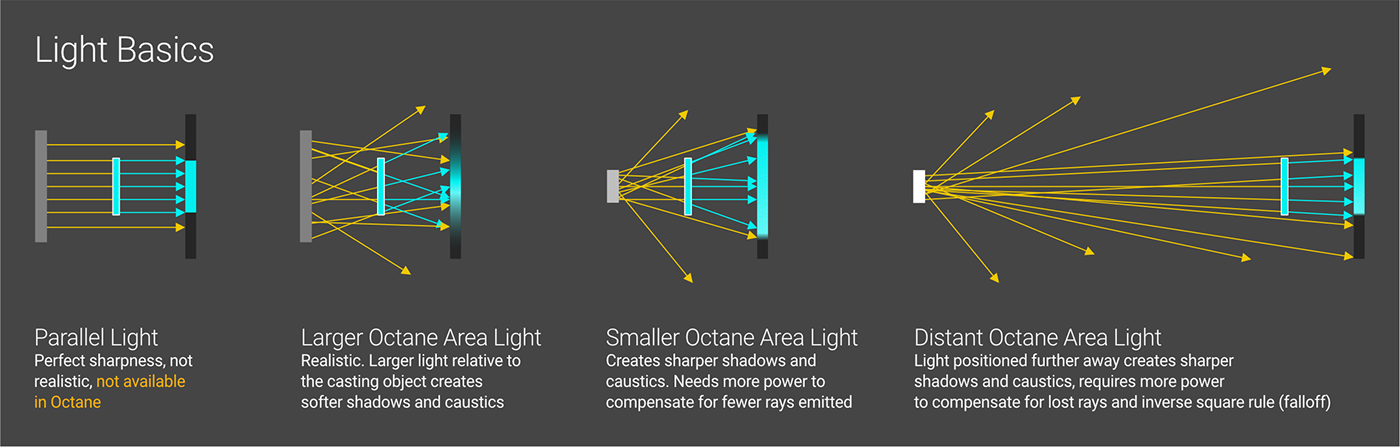
The sharpest possible shadows and caustics would occur with a parallel light, where all the rays are emitted in exactly the same direction. There isn’t a real-world counterpart for this type of light though, so it doesn’t exist in Octane.
Real world (and Octane) light sources emit rays in all different directions. Our goal is to get as many parallel-ish rays as possible reflecting off or traveling through our casting object. The curvature of a reflective object or IOR/curvature of a refractive object can then concentrate of these rays further to give us crisp, clear caustics.
Rays that don’t hit our object, but hit the surface surrounding it will just appear as normal illumination, and depending on the size and angle of the light, this can muddy or wash out our caustic pattern.
So if we can’t get a parallel light going, how do we control the light rays?

We can make the surface area of the light smaller relative to our casting object. This will cause fewer rays to hit our object, but those rays will be more parallel than a larger light because the other more severely angled ones simply won’t hit our object. If we’re using Surface Brightness, we’ll need to make the smaller light more powerful than a larger one. A closer, smaller light will make the caustics/shadow area larger and distort it, which may or may not be desirable. If the caustics are a primary goal of the render, then tweaking the size of the lights that hit the casting objects is one of the easiest ways to control the sharpness.
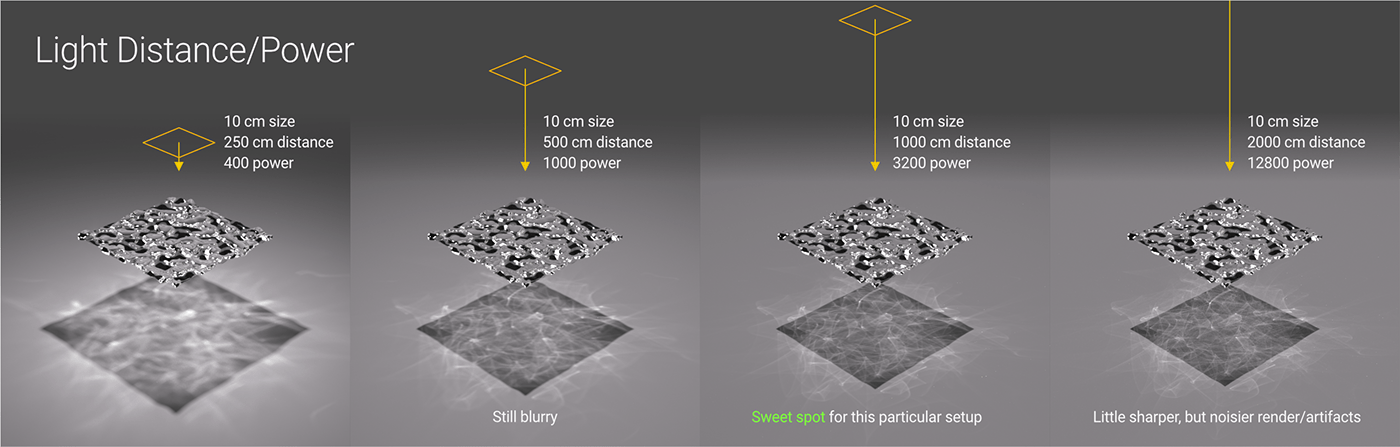
We can also move the light further away from casting object. Again, fewer rays will hit the casting object because of the geometry and angles, and now we also have to worry about the falloff of the light (running out of energy over distance before it hits our object), and up the power accordingly. The benefit to this is that the rays will be quite a bit more parallel and produce sharper and less distorted caustics and shadows. The drawback is that it takes a lot of fiddling to move it the right distance to focus well. Unless the caustic pattern size is a concern, it’s better to “focus” the caustics using the size of the light and IOR of the material.
Light Cancellation
One of the big issues with blasting a bright light down on a surface is that the light itself can muddy or wash out the caustic pattern. There are a few ways to deal with this, such as gobos, IES lights, and blocking out rays by setting up pieces of geometry that physically block them , but a Spotlight Distribution node is a quick and easy solution we can look at.
As of this writing, neither Octane nor C4D’s light linking does NOT work with caustics.
To get a spotlight distro on an area light, we just need to click the Octane Light tag on the Area Light and go to the Light Settings. Here we need to click the little down-arrow button next to Distribution, choose c4doctane, and then choose Spotlight Distribution.

The Cone Angle and Hardness are the two most important values here. They are going to be different depending on the size of the light, the distance from the light to the casting object, and the shape of the casting object, so it’ll just be a matter of playing around until it looks good.
Render Settings
The last part of the caustics equation are the render settings.
Caustics are created in the Pathtracing, PMC, and Photon Tracing kernels. For a while, Pathtracing was the fast way to get okay-ish but denoise-able caustics, and PMC was the go-to for better looking, but GPU- and patience-punishing caustics. Recent versions of Octane now include the Photon Tracing kernel which is like a supercharged version of Pathtracing that’s better than the best aspects of both PT and PMC. In fact, it’s so much better that we’re not really going to bother with the other two kernels in this guide.
Many of the settings are the same as Pathtracing, so we won’t cover those as much as the new Photon tracing-related settings.
The absolute most important thing to now about caustics in Photon tracing is that it’s material-driven. If all materials and objects in a scene were taken into consideration when generating caustics, our computers would probably catch on fire, so a line had to be drawn somewhere so we could actually finish our renders.
Important: Only casting materials that have “Allow Caustics” checked in the IOR channel will cast caustics in the Photon Tracing kernel.
Also, Fake Shadows must be unchecked in the Common tab or else it won’t work.
Ok, great, with that out of the way, we can start looking into the tweaky settings.
Basic Photon Tracing Settings
The top portion of the settings window is very similar to Pathtracing.
Max samples still controls how many passes the kernel does to resolve the image. More passes generally means less noise. The great part about photon tracing is that we need FAR fewer samples to resolve caustics than PT or PMC, so while doing lookdev, we can actually get away with 256 or 512, which is amazing.
Diffuse, Specular, and Scatter depth don’t affect caustics, but they still need to be considered for the look of the objects themselves.

Ray epsilon does actually make an impact on the caustics, but most of the time it shouldn’t be messed with. Keeping it really low (default of 0.0001) is good for realism, but we can start upping it by orders of magnitude to get different artistic effects.
GI clamp doesn’t directly affect caustics, but it still affects other GI-related light stuff in the scene. A good default for this is 10, and if the scene is very caustics-heavy and little else, try setting it to 1 and see if the render cleans up faster.
Caustic-specific Settings

Photon depth: Similar to the Diffuse/Specular/Scatter depth, this has to do with how many bounces through different materials the photons will travel before they go extinct.
For the most part we can leave it at the default (6), but we’ll want to raise it if we have a lot of panes of glass the light is traveling through, or several mirrors in a scene. It doesn’t impact the render time terribly, so we’d only really want to lower it if we’re getting wild caustics we don’t want for style reasons.

Photon gathering radius: This is probably the most important caustic-related setting. It’s basically the resolution of the photons. The larger the number, the smoother/softer the caustics will resolve - too high and it gets blurry. The smaller this number, the sharper and the caustics will resolve - too small, and graininess and artifacts can appear. It’s a balancing act.
Raphael Rau (Silverwing) has a brilliant technical video on how the Pathtracer works, and also some of the mechanics behind the Photon Tracing kernel here, so if you’re interested in knowing more about what the gathering radius is really doing behind the scenes, check that out.

Photon Count Multiplier is kind of like a bias slider for how much attention Octane puts on caustics vs other pathtracing calculations. Given infinite time and samples, it wouldn’t matter if this was set to 1 or 8 - eventually everything would resolve about the same, but as of now, we don’t have time for infinite samples, so we need to direct Octane where to put its efforts.
As a rule, if the scene has easy caustics (one light source, reflective material, soft caustics that are not a big part of the scene), then the default of 2 will suffice, and more weight is put on making the rest of the scene look better faster. If the scene is all about the caustics and there are crazy, sharp patterns and refraction and dispersion and the GPU is huddled in the corner, crying, max this out at 8 if you have the VRAM for it.
Setting it to 8 during lookdev is also a good way to resolve the caustics faster to allow for faster tweaking of lights/materials/etc. Once all that is in place, this can be brought back down to work on the rest of the scene.

Photon Gather Samples - this can vastly speed up caustics renders depending on the makeup of the scene and tolerance for noise. For the scene above, 2 (default) provides good quality at a reasonable render time considering the hardware, use case, size, etc. When the gather samples are brought to 4, it nearly shaves a minute off the render, which is great for lookdev, but it introduces a little bit of noise which may or may not be acceptable. As the samples are increased, the noise goes way up while the render times only get slightly better. The trick is finding the sweet spot for lookdev, and then the one for a final render. (8, and 2 respectively for this scene).
Photon Exploration Strength - Most of the time this should just be left alone, but if there’s a little bit of noise left that doesn’t seem to want to go away, cranking this to 1 may help at the cost of some render time. Setting it to 0 can produce some interesting artistic effects as well.
Denoising
The same rules apply for denoising caustics as anything else in a render. Typically the larger, smoother, and more organic the forms are, the better the denoiser works. Sharp renders with a lot of detail and tight patterns can get ravaged if not enough samples are thrown at the initial render prior to denoising.

In a simple reflective setup like the one above, we can see that it does a respectable job, even at 8 samples (yes, 8!). 64 or 256 is probably better for this scene, but we have a lot of leeway here. The denoiser smooths everything out nicely.

In a complicated setup like this, we can see (especially in the center right at the base of the cylinder and also on the back wall of it), that the denoiser munges up the fine caustic patterns. It’s not until we get into the 8192 range that it starts to be acceptable for final output.
Path Term Power, Coherent Ratio, and Adaptive Sampling are all the same as their Pathtracing counterparts.
Path Term Power is helpful if there’s a lot of noise in the darker areas of the render. We can lower this to clean some of that up. We can also raise it to speed the render up, but introduce more noise in darker areas - if the render has no dark areas, this may be a good way to cut down on the render time.
Coherent Ratio can also speed up the render quite a bit, but there will be a lot of noise and artifacts unless the max samples are set fairly high. This can be especially problematic in animations.
Adaptive Sampling has its own workflow (check out this video by Raphael Rau) and is out of scope for this guide, but it does work with Photon Tracing.
IV. Caustics Workflow
So that was a lot to take in, but here’s a workflow we can use if we want to feature caustics in our render:
1. Place objects in the scene - use real-world scale whenever possible, think about how the objects will either reflect or refract light. For refraction, vary the wall thickness or shape thickness. Also think about the surface the caustics will appear on and leave room for the patterns.
2. Enviro: Set up a basic environment like an HDRI, and turn the power way down (0.1 or 0.2 to start). If no environment is needed, set the default environment in settings to black.
3. Materials: Build and apply materials for the casting objects. These are reflective or refractive, allowing as much light to bounce off of or travel through as possible - so light colors, very little if any roughness. Turn on Allow Caustics in the IOR channel. Unless you have stellar hardware, don’t turn on Dispersion until later in the process. For receiving objects, matte, darker materials work great, or add roughness to reflective ones.
4. Lookdev settings: Switch to the Photon Tracing Kernel. Set max samples to 256 to start (more if you have better hardware). Up the specular depth to 24 if a lot of refraction or reflection is in the scene. Set GI clamp to 10 (or possibly 1 if it doesn’t affect the look). Set the gathering radius to 0.005, count multiplier to 8 (if the card has enough VRAM), gather samples to 8.
5. Lights: Set up area lights to produce caustics. Use a distribution (gobo/spotlight/etc) to restrict the light to the casting objects. Turn off surface brightness for more control of the light power. Smaller lights produce sharper caustics. Closer lights produce larger caustic patterns, but can cause blurriness or distortion. Further lights need to be a lot more powerful to reach the object. Move the lights around and test out different sizes and angles - little changes make large differences here. Adjust environment as needed.
6. Tweak time! To sharpen the patterns, change the light size & distance, and the gathering radius. To speed up renders at the cost of noise, up the gather samples. Change the shape/bevel/size/location of reflective objects and the IOR and wall thickness/shape of refractive ones to alter the pattern. Play with material colors to increase brightness/look of patterns. Now is the right time to turn on Dispersion if desired. For complex scenes with a lot of bounces, try higher photon depths.
7. Final settings: Up the max samples to 4096. Lower if the scene resolves quickly, raise it if the caustics are more complex and need more passes. If the scene is super caustics-heavy, leave the count multiplier at 8 - if not, reduce it to balance caustics and the look of the rest of the scene. Make sure the photon depth is high enough so detail isn’t lost. Find the sweet spot for gathering radius. For sharp caustics, this will probably be in the 0.001-0.005 range. Softer caustics will probably be in the 0.01-0.09 range. Bring the gather samples down to 2, experiment between 2-16 to find a good balance between render time and noise. See if changing the photon exploration strength to 1 does anything. It probably won’t :D. Turn on the denoiser if needed, and get enough max samples going so the denoiser doesn’t destroy fine patterns.
8. Render!
Wrap Up
Hopefully you have a much better understanding of caustics and the new Photon Tracer kernel in Octane render. This is one of the more difficult tasks for a render engine, so it’s going to take time and patience to get really good at it. Totally worth it though :)
The knurled knob used in some of the examples above was created using Jonas Pilz’ procedural knurling technique. It looks pretty great with caustics.
Raphael Rau (Silverwing) has a brilliant technical video on how the Pathtracer works, and also some of the mechanics behind the Photon Tracing kernel here.
The elephants in the cover image are sculpt bases in the C4D asset library with a dispersion glass material and one single light. Render time was about a half hour with ~16,000 samples + the denoiser on an OB1750 rig. Resolution is 2560x1000.
Author Notes
OG05 Caustics and the Photon Tracing Kernel, version 1.1, Last modified April 2023.
This guide originally appeared on https://be.net/scottbenson and https://help.otoy.com/hc/en-us/articles/212549326-OctaneRender-for-CINEMA-4D-Cheatsheet
All rights reserved.
The written guide may be distributed freely and can be used for personal or professional training, but not modified or sold. The assets distributed within this guide are either generated specifically for this guide and released as cc0, or sourced from cc0 sites, so they may be used for any reason, personal or commercial. The emoji font used here is Noto Color Emoji.


